
Changes
Updated on June 29th 2026 to include the new fuzz-reachability tool
Key takeaways
- Coverage is measurement, not mutation feedback. AFL++'s internal bitmap steers the fuzzer; it doesn't tell you which functions or branches the campaign actually reached.
- Run the loop, not just the campaign. Fuzz → measure → analyze → unlock → re-fuzz. Each pass deepens what your harness can reach.
- Pick the right metric. Region or branch coverage from
llvm-covis the actionable view. Line coverage hides shallow paths; MC/DC is overkill for security fuzzing. - Use
cov-analysisto skip the boilerplate. It wraps the build flags, the replay loop, and thellvm-profdata/llvm-covinvocation, and emits a text report that an LLM can actually read. - Tell unreachable from un-unlocked with
fuzz-reachability. It statically computes which functions your harness can even reach, so an uncovered region is either a reachable gap to chase with seeds or a structurally unreachable one that needs a new harness — andcov-analysiscan augment that information into the report.
Introduction
A week of AFL++ leaves you with millions of executions, thousands of corpus entries, and maybe a handful of crashes. None of that tells you which functions the fuzzer reached, which parser branches it never took, or which error handlers it never triggered.
The fuzzer's bitmap is built to steer mutation, not to answer those questions. Coverage analysis is the separate step that does. It shows where the gaps are, lets you decide which gaps are worth closing, and gives you a defensible answer to "is this campaign done?"
This article is #8 in our "Fuzzing Made Easy" series. It covers how to obtain accurate coverage, what the different metrics mean, how to read a coverage report, and how to systematically unlock the code regions your fuzzer is missing. We also cover how AI can assist in the process, and how to track progress across iterations.
We deliberately leave out some details — lcov usage, source-path stability, and miscellaneous corner cases — to keep this post readable. The in-depth LLVM tool links at the end go deeper.
The target audience of this post is security researchers and fuzzing engineers who already know how to set up and run a fuzzing campaign, but want to get more out of their efforts or trust their results. We also explain how AI can save you time during analysis.
Why coverage analysis matters for fuzzing
Coverage-guided fuzzers like AFL++ use lightweight edge coverage and other content-based signals to steer mutation. Every time a new edge (a transition from basic block A to basic block B) is observed, the input that triggered it is saved to the corpus. This is what makes coverage-guided fuzzing so effective compared to blind random mutation: the fuzzer can actively mutate input seeds that exercise different code paths.
But the fuzzer's internal coverage map is a feedback mechanism, not an analysis tool. It does not tell you which source lines or functions were covered, does not give you a file-by-file breakdown, and does not show you uncovered branches in a form you can read and act on.
Coverage analysis is the separate step that provides this visibility. The workflow is a loop:
- Fuzz — run the campaign, building the corpus (an upcoming post in this series will cover how to run an effective fuzzing campaign).
- Minimize (optional) — deduplicate and reduce the corpus (an upcoming post in this series will cover corpus minimization).
- Measure — compile the target with coverage instrumentation, replay the minimized corpus, merge coverage, generate a report, maybe diff to previous coverage.
- Analyze — read the report, identify gaps, categorize them (unreachable? missing seed? missing harness?).
- Unlock — add seeds, modify harnesses, or write new ones to close the gaps.
- Repeat — fuzz again with the improved setup, then re-measure.
Each iteration through this loop increases the effective depth of your fuzzing campaign. Without the analysis step, iterations 4–6 do not happen, and the fuzzer stagnates at whatever coverage ceiling it reached on its own.
In practice, the difference between a superficial and a thorough fuzzing campaign comes down to how often, and how skillfully, you iterate through this loop.
A caveat before we go further: coverage analysis is expensive. Prioritize, and know when the next coverage hour is better spent writing a new harness instead.
When to perform coverage analysis
When should you enter the coverage analysis loop? Not immediately — let the fuzzer do its job first. Coverage analysis is most valuable once the fuzzing campaign has reached a plateau: the point where the fuzzer is no longer discovering new paths on its own. Performing analysis earlier wastes effort, because the fuzzer would have unlocked those regions by itself given more time. The question is how to distinguish a real plateau from a temporary lull. This depends on the target, but two practical heuristics cover most cases:
- For typical targets: The campaign has plateaued when no new coverage has been discovered in the last 50% of total fuzzing time. If you fuzzed for 48 hours and nothing new appeared in the last 24 hours, the available coverage is very likely exhausted.
- For large targets with deep state spaces: these are targets that can be fuzzed for months and still occasionally discover new paths. Here a stricter definition is needed: the campaign has plateaued when the last 25% of total fuzzing time contributed less than 1% of additional coverage. At that point the fuzzer's return on time invested has collapsed, and manual analysis is the better use of your effort.
Coverage types
We focus on C/C++ and Rust source-based coverage; the same concepts carry over to other compiled or scripting languages. We also include a short section on binary-only coverage further down, since it is another common case in fuzzing work.
Source code coverage
We only cover LLVM/clang here. Targets that only compile with gcc/g++ are thankfully very rare, and similar concepts apply in those cases.
GCOV coverage
This mode is enabled with clang(++) (and gcc/g++) with the --coverage flag (which is a synonym for -fprofile-arcs -ftest-coverage).
Clang supports this for drop-in compatibility with GCC tooling:
- Classic line/branch/function coverage
- Produces
.gcno(static graph) +.gcda(runtime counters) files (per source file) - Analyzed with
gcovorlcov/genhtml
This mode should not be used for new work and is only mentioned here for historical reasons. Source-based coverage (below) is superior in every practical dimension: it tracks actual source regions rather than approximating from debug info, it handles macros and templates correctly, it avoids .gcda merge races when processing large corpora, and it produces a single .profraw per run which is simpler to manage. The only reason you might encounter GCOV-style coverage in practice is legacy systems.
Source based coverage
This is the modern way to obtain coverage, and it is enabled with the compile options -fprofile-instr-generate -fcoverage-mapping:
- Much more accurate than GCOV: tracks actual source regions, not just lines
- Handles macros and templates correctly — coverage is attributed to the right expansion site
- Produces
.profrawfiles that are merged into a.profdatafile using the toolllvm-profdata - Analyzed with
llvm-cov show/llvm-cov report - Supports MC/DC coverage (
-fcoverage-mcdc, requires clang 17+) — important for safety-critical standards (DO-178C, ISO 26262), but not used in typical fuzzing coverage analysis
This is the best coverage option available. All instructions in the rest of this article assume this source-based coverage.
How it works internally: At compile time, clang embeds a coverage mapping section into the binary that records the correspondence between instrumentation counters and source code regions. At runtime, each counter is incremented when its region is executed. On program exit (or on explicit __llvm_profile_write_file() call), a .profraw file is written containing all counter values. The llvm-profdata merge tool combines multiple .profraw files into a single .profdata, and llvm-cov uses the .profdata together with the embedded mapping to produce human-readable reports.
The key advantage over GCOV is granularity: source-based coverage operates on regions (contiguous spans of source code between control flow boundaries), not on lines. A single line like if (a && b && !c) contains multiple regions (is a true, is b true, is c false), and source-based coverage tracks each independently, whereas GCOV coverage would show this as fully covered even if a is false (which immediately terminates the evaluation of the if).
Binary-only
When source code is not available — closed-source libraries, firmware blobs, proprietary parsers, or targets where the build system cannot be modified — binary-only coverage is the only option.
The standard approach is DynamoRIO's drcov tool, which records basic block execution at runtime without requiring recompilation. The workflow is:
- Run the target under DynamoRIO with the
drcovclient:drrun -t drcov -- ./target input_file - This produces a
.logfile containing the list of executed basic blocks and their addresses. - Load the
.loginto a disassembler for visualization:- IDA Pro / Binary Ninja: Lighthouse plugin — highlights covered/uncovered blocks in the disassembly view
- Ghidra: Lightkeeper plugin and Cartographer — mostly equivalent functionality for Ghidra
Binary-only coverage is inherently less precise than source-based coverage: you see basic blocks and addresses, not source lines and branches. There is no concept of "region coverage" or branch-level detail. You also lose the ability to filter by source file or function name easily, which makes analysis more labor-intensive.
However, for black-box targets, it is invaluable. The conceptual framework described in the rest of this article — identifying uncovered regions, categorizing why they are uncovered, and systematically unlocking them — applies equally to binary-only coverage. You are just working with assembly-level basic blocks instead of source-level regions.
The rest of this article focuses on source-level coverage; the same methodology applies to binary-only analysis.
Coverage metrics: what they measure and where they diverge
Understanding what your coverage report actually counts is essential before you start interpreting numbers.
Line coverage: is this source line executed at least once? This is the coarsest useful metric. A line with a complex conditional (if (a && b || c)) shows as "covered" if any part of the expression was evaluated, even if short-circuit evaluation meant b and c were never tested. GCOV's branch counters can partially address this, but they operate on compiled branch points rather than source-level regions, making them harder to map back to specific conditions in the source. Source-based region coverage (what llvm-cov provides) tracks each sub-expression independently, which is why it is preferred.
Function coverage: is each function called at least once? Even coarser than line coverage, but useful as a quick triage tool: if entire functions show as uncovered, that usually indicates a missing harness or a missing API call in an existing harness, but it can also mean that the fuzzing campaign was unable to unlock some features on its own.
Edge coverage: is each control flow edge (a transition from block A to block B) exercised? This is what AFL++ internally tracks via its shared bitmap. Importantly, edge coverage is not the same as branch coverage: edge coverage captures the context of how a block was reached (which predecessor), while branch coverage only asks whether a branch was taken at all. Your llvm-cov report and your AFL++ bitmap are measuring related but different things. Do not expect the numbers to agree. (Fuzzers usually also gather additional signals beyond edge coverage, but that is out of scope for this post.)
Region coverage: tracks contiguous source regions between control flow boundaries. More precise than line coverage because a single line can contain multiple regions. For example, in int r = a ? f() : g();, there are three regions: the overall expression, the f() region, and the g() region. llvm-cov reports region coverage natively and it is the most granular metric available without going to MC/DC. Note that region coverage is llvm-cov-specific: a function can show 100% line coverage while having only 50% region coverage. This happens whenever there is a conditional where only one direction was ever taken. Region coverage is the minimum level of detail you should examine during analysis, and is substantially more informative than line coverage.
Branch coverage: for each branch point (if/else, switch case, loop entry/exit, short-circuit evaluation), are both/all directions taken? Branch coverage is typically stricter/more granular: 100% branch coverage implies 100% region coverage, but not vice versa. It is therefore usually the gold standard that everyone should use for coverage analysis.
MC/DC (Modified Condition/Decision Coverage): each individual condition in a compound decision independently affects the outcome. For if (a && b), MC/DC requires test cases showing that flipping a alone changes the outcome and flipping b alone changes the outcome. This is required by safety-critical standards (DO-178C Level A, ISO 26262 ASIL D) but is overkill for typical fuzzing coverage analysis. Clang supports MC/DC measurement via -fcoverage-mcdc since version 17, but it increases instrumentation overhead and report complexity significantly.
What to use for fuzzing analysis
Region or branch coverage from llvm-cov is the most actionable metric. Line coverage is too coarse to reveal meaningful gaps. MC/DC is too expensive for the marginal benefit in a security fuzzing context. AFL++'s bitmap is designed for steering mutation, not for human analysis. Use llvm-cov report for the summary and llvm-cov show for the annotated source.
Obtaining coverage
A note on stability
Before we start to obtain coverage there is an important caveat to point out: instability. Stability means that an input always traverses the same path in a fuzzing target. Instability in this context means that an input path can divert in some areas of the code. This is a problem for fuzzing as well as for coverage analysis. This happens when randomness is introduced (e.g. when hash maps are used in the target) or timer or other signals trigger, interrupts from other code paths, or global state that is not reset between fuzz/coverage executions, etc. AFL++ and libafl surface this through their stability metric. We recommend reviewing unstable areas in the code and, if necessary, removing these parts (e.g. by not instrumenting them, disabling the feature, etc.). The AFL++ project's guide on improving stability is a good starting point for locating unstable edges.
A practical tool for pinpointing the exact source lines that cause instability is cov-analysis stability. It replays each corpus input multiple times through a coverage-instrumented binary, compares per-line hit counts across runs, and reports the specific source lines whose counts vary between runs. See the cov-analysis section below for how to build the coverage binary; once you have it, a single command identifies the problematic lines:
cov-analysis stability -d /path/to/afl-out -e "./cov @@"The output lists exact file paths and line ranges (e.g. parser.c:55-61) that you can then review and — ideally — exclude from instrumentation or rework.
For Rust, ziggy can perform the same analysis with its stability command.
C/C++
The following description is a step-by-step guide that walks through the process manually so you understand what each piece does. If you want to skip straight to automation, the AFLplusplus/cov-analysis tool (the modern replacement for afl-cov and libfuzzer-cov) automates nearly all of the steps below — see the Using cov-analysis to automate the workflow subsection further down.
Step 1: Compile the target for coverage
Compile the target including the harness with coverage instrumentation. The key flags are:
export CFLAGS="-fprofile-instr-generate -fcoverage-mapping -DFUZZING_BUILD_MODE_UNSAFE_FOR_PRODUCTION=1"
export CXXFLAGS="-fprofile-instr-generate -fcoverage-mapping -DFUZZING_BUILD_MODE_UNSAFE_FOR_PRODUCTION=1"
export LDFLAGS="-fprofile-instr-generate"
export CC=clang
export CXX=clang++
As covered in Fuzzing Made Easy #2, #ifdef FUZZING_BUILD_MODE_UNSAFE_FOR_PRODUCTION is used in source code to skip expensive checks that hurt fuzzing — checksums, HMACs, and so on. The coverage build must define it too, so inputs follow the same instruction flow they did during fuzzing.
Note that coverage results may still not perfectly match what the fuzzer encountered at runtime, especially when using different optimization levels or sanitizers for fuzzing than for coverage analysis.
Pass these into whatever build system the target uses (./configure, cmake, meson, etc.). We recommend not including any sanitizer flags (-fsanitize=...) in the coverage build. Sanitizers add extra branches and error-handling code that pollute coverage results and will show up as uncovered regions that are not part of the actual target logic. If all fuzzing happened with sanitized targets, leaving them on keeps the coverage closer to what the fuzzer actually saw — pick whichever trade-off matters more for your campaign.
If you use outdated GCOV instrumentation then ensure you use -O0 or -O1. Higher optimization levels can inline functions, eliminate dead code, and reorder branches in ways that make the coverage report harder to map back to the source. -O0 gives the most faithful mapping. Modern source-based coverage does not have this issue though, use any optimizations there that you prefer — but -O0/-O1 will make debugging easier.
For LLVMFuzzerTestOneInput harnesses (the standard libFuzzer/AFL++ harness API), you need a driver that reads files from disk and calls the harness function. This skeleton does the job:
#include <stdio.h>
#include <stdlib.h>
#include <signal.h>

int LLVMFuzzerInitialize(int *argc, char ***argv) __attribute__((weak));
int LLVMFuzzerTestOneInput(const unsigned char*, size_t);

extern int __llvm_profile_write_file(void);

static void crash_handler(int sig) {
    __llvm_profile_write_file();
    fprintf(stderr, "ERROR: Coverage gathering aborted because of a crash!\n");
    // SA_RESETHAND means the signal handler is reset already
    raise(sig);
}

__attribute__((constructor))
static void install_crash_handlers(void) {
    const int sigs[] = { SIGABRT, SIGSEGV, SIGBUS, SIGFPE, SIGILL, SIGTERM };
    struct sigaction sa = {
        .sa_handler = crash_handler,
        .sa_flags   = SA_RESETHAND,
    };
    sigemptyset(&sa.sa_mask);

    for (int i = 0; i < (int)(sizeof(sigs) / sizeof(sigs[0])); i++)
        sigaction(sigs[i], &sa, NULL);
}

int main(int argc, char **argv) {

  if (LLVMFuzzerInitialize) {

    fprintf(stderr, "Running LLVMFuzzerInitialize ...\n");
    LLVMFuzzerInitialize(&argc, &argv);

  }

  for (int i = 1; i < argc; i++) {

    FILE *f = fopen(argv[i], "rb");
    if (f) {

      fseek(f, 0, SEEK_END);
      long len = (ssize_t)ftell(f);

      if (len > 0) {

        fseek(f, 0, SEEK_SET);
        unsigned char *buf = (unsigned char *)malloc((size_t)len);

        if (buf) {

          size_t n_read = fread(buf, 1, (size_t)len, f);

          if (n_read > 0) {

            fprintf(stderr, "Running: %s (%d/%d) %zu bytes\n", argv[i], i, argc - 1, n_read);
            LLVMFuzzerTestOneInput((const unsigned char*)buf, n_read);

          } else fprintf(stderr, "Error: Read failed for %s\n", argv[i]);

          free(buf);

        }

      }

      fclose(f);

    }

  }

  fprintf(stderr, "Done.\n");
  return 0;

}
Link this driver with the coverage-instrumented target library. We assume the resulting binary is named ./cov.
Important: If you have multiple harnesses, you need to compile them all against the same coverage-instrumented build of the target library. Each harness gets its own driver binary (./cov-fuzzer_a, ./cov-fuzzer_b, etc.), but they share the same .o / .a / .so files so that coverage counters accumulate across all of them.
Step 2: Minimize the corpus
Optionally, before collecting coverage, you can minimize your corpus (per harness) to remove redundant inputs. This reduces processing time and noise in the report. An upcoming post in this series will cover corpus minimization in detail.
Note that it is often faster and easier to just skip minimization and use the AFL++ main instance's queue/ for coverage gathering!
What you should never do is minimize a campaign that uses different base fuzzers (e.g. AFL++, libfuzzer and honggfuzz) with a single minimizer (e.g. afl-cmin). Every base fuzzer identifies coverage differently, and in our experience this costs about 20% of coverage for the other base fuzzers.
Step 3: Collect coverage and generate the report
Collecting the coverage is straightforward. In this example we use the corpus of an AFL++ main instance in out/:
# prepare for the report and cleanup
mkdir report
rm -f *.profraw
export LLVM_PROFILE_FILE="cov-%p.profraw"

# this runs all fuzzer corpus inputs to gather coverage, find + xargs ensure even a huge corpus runs through
find out/main/queue -name 'id*' -print0 | xargs -0 ./cov >/dev/null 2>&1

# potentially slow: run crash/timeout inputs one-by-one with a time limit
for input in out/main/crashes/id* out/main/timeouts/id*; do
  test -e "$input" && timeout --signal=SIGTERM 5s ./cov "$input" >/dev/null 2>&1
done

# transform the gathered coverage to an HTML report
llvm-profdata merge -sparse *.profraw -o report/coverage.profdata
llvm-cov show ./cov  -instr-profile=report/coverage.profdata -format=html -output-dir=report -show-directory-coverage -show-line-counts-or-regions -show-branches=count
The coverage report in ./report/index.html can then be viewed in a browser.
For machine-readable output (useful for scripting, CI integration, or the differential coverage workflow described later), use llvm-cov export ./cov --format=text -instr-profile=report/coverage.profdata > report/coverage.json
Getting coverage from additional libraries: If you instrumented shared libraries for coverage (and did not forget to set a proper LD_LIBRARY_PATH) they will not show up in the coverage report unless you give the parameters -object libname.so for each instrumented library to the llvm-cov show command. Hence, like with fuzzing, it is less error prone to compile your coverage harness statically.
Filtering out noise: You can add -ignore-filename-regex='(^/usr/include/|.*/third_party/|.*/test/)' to llvm-cov to filter out directories that are not part of the target code, e.g. test scaffolding, third-party vendored libraries, generated code, etc.
If you have multiple fuzzing harnesses for a target (you should!) and want to consolidate them to look for coverage gaps (this is what this blog post is about), then you should put the coverage.profdata and HTML report in a per-harness directory, e.g. a structure like report/<harness_name>/report/, which will make consolidating easier (see the next major chapter below).
If a harness crashes, the atexit handler that writes the .profraw never runs and that run's counters are lost. To handle this, install a signal handler that calls __llvm_profile_write_file() for signals like SIGSEGV and SIGABRT — the example coverage driver above has this included, but note that it terminates afterwards, leaving any subsequent corpus inputs unprocessed.
Using cov-analysis to automate the workflow
Everything in Steps 1–3 above can be replaced with AFLplusplus/cov-analysis. It is a small bash tool that wraps the clang coverage flags, the replay loop, llvm-profdata merge, and llvm-cov report generation. It auto-detects AFL++, libFuzzer/libafl, and honggfuzz corpus layouts, so the same command works regardless of which fuzzer produced the corpus.
Prerequisites: clang, llvm-profdata, and llvm-cov (version 11 or newer; auto-detected). No Python or additional libraries.
Step 1 replaced — build with coverage instrumentation. Instead of manually exporting CFLAGS, CXXFLAGS, LDFLAGS, CC, and CXX, wrap your build command with cov-analysis build:
cd /path/to/project-cov/
cov-analysis build ./configure --disable-shared
cov-analysis build make -j$(nproc)
This sets the same flags described above (-fprofile-instr-generate -fcoverage-mapping -DFUZZING_BUILD_MODE_UNSAFE_FOR_PRODUCTION=1 plus CC=clang / CXX=clang++) for the duration of the wrapped command. The FUZZING_BUILD_MODE_UNSAFE_FOR_PRODUCTION=1 define is critical and must match what was used during fuzzing — cov-analysis build sets it for you.
Replay driver. For LLVMFuzzerTestOneInput harnesses, instead of copy-pasting the driver skeleton from Step 1, generate it with:
cov-analysis driver -o coverage_driver.c
clang -fprofile-instr-generate -fcoverage-mapping \
  -c coverage_driver.c -o coverage_driver.o
clang -fprofile-instr-generate \
  coverage_driver.o -L./build -ltarget -o cov
The generated driver loops over all file arguments, calls LLVMFuzzerTestOneInput for each, and installs the same SIGSEGV/SIGABRT/SIGBUS/... crash handler that flushes profiling data before termination — so crashing inputs still contribute to coverage.
Step 3 replaced — replay the corpus and generate the report. Point cov-analysis at the fuzzer output directory:
cov-analysis report -d /path/to/afl-fuzz-output/ -e "./cov @@"@@ is the input-file placeholder, matching AFL++ convention. Omit @@ if the target reads from stdin:
cov-analysis report -d /path/to/afl-fuzz-output/ -e "./target"For AFL++ output, the tool automatically:
- Batch-replays all
queue/id:*files (fast path) - Replays
crashes/id:*andtimeouts/id:*one-by-one under a 5-second timeout so a hanging input cannot stall the whole run - Merges
.profrawprofiles withllvm-profdata - Produces HTML, text, JSON, and summary reports under
/path/to/afl-fuzz-output/cov/
For libFuzzer/libafl/honggfuzz corpora the tool auto-detects the flat layout; crash-like artifacts (crash-*, leak-*, oom-*, SIG*.fuzz) are replayed one-by-one under the timeout. Force layout detection with --layout afl|flat if needed.
Parallelized replay. For large corpora, add -t N to fan out the replay across N worker processes:
cov-analysis report -d /path/to/afl-fuzz-output/ -e "./cov @@" -t 8Parallel AFL campaigns. For afl-fuzz -M/-S sync directories, just point -d at the top-level sync dir — cov-analysis discovers all fuzzer instance subdirectories automatically.
Output layout. The default output goes to <afl-dir>/cov/ (override with -o) and contains everything you need:
<afl-dir>/cov/
  html/index.html     ← browse this for annotated source coverage
  text/               ← text format, ideal for feeding into an LLM for gap analysis
  summary.txt         ← per-file line/branch/function percentages
  coverage.json       ← machine-readable export
  coverage.profdata   ← merged profile (baseline for iterative improvement)
Note the text/ output: as discussed later in the AI section, text reports are much easier for an LLM to reason about than the HTML or JSON form, so cov-analysis writes it by default — no separate llvm-cov show -format=text invocation needed.
Filtering noise. To exclude third-party or test directories from the report, pass --ignore-regex:
cov-analysis report -d out/ -e "./cov @@" --ignore-regex '(^/usr/include/|.*/third_party/|.*/test/)'The default ignore pattern is /usr/include/.
When to still use the manual workflow. cov-analysis does not currently handle merging coverage across different harnesses for the same target in a single command — for that, follow the multi-harness merge script in the next section. You can, however, run cov-analysis once per harness, then feed the individual coverage.profdata files into the llvm-profdata merge step of that script.
Annotating coverage with static reachability
A raw coverage report shows you what was not covered but cannot tell you whether an uncovered region was even reachable in the first place. fuzz-reachability (covered in detail in the Unlocking coverage section below) supplies exactly that missing axis, and cov-analysis can augment the report with this information:
# first compute reachability for the harness (writes reachability.json + reached.txt/not_reached.txt)
reachability run --lang cpp --project /path/to/project-cov/

# then build the coverage binaries
... perform the build steps shown previously ...

# then cross-reference it when generating the coverage report
cov-analysis report -d /path/to/afl-fuzz-output/ -e "./cov @@" --reachability reachability.json
--reachability accepts the JSON report, the output directory, or a single sancov .txt list, and annotates the HTML and text reports in place. Every uncovered function is then tinted by which bucket it falls into:
- reachable but not reached (amber) — the fuzzer can get here; this is the actionable gap, a seed/mutation/harness-tweak problem (buckets 1–2 above).
- statically unreachable (dark grey) — the fuzzer cannot get here no matter how long it runs; either it is out of scope/dead, or it needs a new or modified harness (buckets 3–4).
- covered yet flagged unreachable (purple) — runtime hit a function the static analysis thought unreachable, which flags the rare under-approximation worth a closer look.
Crucially, it also recomputes the function/line/region/branch percentages to exclude statically-unreachable functions, so dead code no longer drags your numbers down — which is precisely the interpretation problem flagged in Interpreting the coverage numbers. Without this overlay you make the reachable-vs-unreachable call by hand for every gap; with it, the report does the triage up front and summary.txt even lists the functions still worth covering.
Rust/Ziggy
We use Ziggy for fuzzing Rust projects because of its simplicity and its efficient defaults. An upcoming post in this series will cover how to write Rust fuzzing harnesses; we will not describe basic Ziggy installation or usage here.
Generating a coverage report after fuzzing with Ziggy is as simple as typing cargo ziggy cover in the fuzzing harness directory. If you want or need the coverage report of imported crates as well, set export CARGO_HOME=.cargo before generating the report.
Merging coverage
This section walks through merging the coverage of different harnesses for the same target to get the overall coverage picture. This is essential to identify coverage gaps.
Note that the profdata file format can change when you switch LLVM/clang versions, so stick with one version for a fuzzing campaign.
C/C++
If you run a fuzzing campaign, you will often have more than one fuzzing harness. After all, a harness targets one functionality, and usually an application or library has multiple functionalities. Even if the target is only encoding and decoding, that means two different harnesses are required.
The reason you need to merge coverage is obvious: each harness exercises a different part of the code. Your encoding harness will have high coverage of the encoder and zero coverage of the decoder, and vice versa. Only the merged view tells you what the campaign as a whole has achieved.
What you have to do compared to the single-harness case: run one coverage-compiled harness after another before you generate the report, and merge their results.
So once you have generated each individual coverage report, just consolidate them to a combined HTML report with these few commands:
# run this after you have generated the individual coverage reports.
# you need the individual `coverage.profdata` files!
# This script expects this structure:
#  report/
#         fuzzer_a/report/ (contains index.html and coverage.profdata)
#         fuzzer_b/report/ (contains index.html and coverage.profdata)
#  etc.

# merge harness coverage profiles
llvm-profdata merge -sparse report/*/report/coverage.profdata -o report/coverage.profdata

# transform the gathered coverage to an HTML report
OBJECTS=""
for fuzzer in `ls report/*/report/coverage.profdata | awk -F/ '{print$2}'`; do
  test -z "$OBJECTS" || OBJECTS="$OBJECTS -object $fuzzer"
  test -z "$OBJECTS" && OBJECTS="$fuzzer"
done
llvm-cov show $OBJECTS -instr-profile=report/coverage.profdata -format=html -output-dir=report -show-directory-coverage -show-line-counts-or-regions -show-branches=count
# for AI analysis, export as text file, better parsable than HTML
llvm-cov show $OBJECTS -instr-profile=report/coverage.profdata -format=text -output-dir=report_txt -show-directory-coverage -show-line-counts-or-regions -show-branches=count
Rust/Ziggy
As a prerequisite you must have created the individual coverage reports for each harness you want to have merged into a consolidated report. You then just execute this script:
# Use this only after you have generated individual fuzzing reports for each harness already!

# RUST fuzzing harness directories
test -d output || { echo Error: no ziggy output/ directory present; exit 1; }
mkdir -p output/report 2>/dev/null

# merge profdata profiles
llvm-profdata merge -sparse output/*/report/coverage.profdata -o output/report/coverage.profdata

OBJECTS=""
for fuzzer in `ls output/*/coverage/index.html | awk -F/ '{print$2}'`; do
  test -z "$OBJECTS" || OBJECTS="$OBJECTS -object target/debug/$fuzzer"
  test -z "$OBJECTS" && OBJECTS="target/debug/$fuzzer"
done

# transform the gathered coverage to an HTML report
llvm-cov show $OBJECTS -instr-profile=output/report/coverage.profdata -format=html -output-dir=output/report -show-directory-coverage -show-line-counts-or-regions -show-branches=count
This generates the coverage report of your Ziggy harnesses. Just open output/report/index.html in your browser to view the consolidated coverage.
Performing coverage analysis
Now we have a merged, consolidated coverage view. What are we looking for?
Interpreting the coverage numbers
Before diving into individual uncovered regions, calibrate your expectations.
100% coverage is almost never the right goal. Every non-trivial codebase contains code that will legitimately remain uncovered: dead code, defensive assertions for "impossible" states, platform-specific branches (e.g. Windows-only code paths in a Linux build), and graceful shutdown handlers that require signals your harness never sends. Chasing these wastes time that could be spent on meaningful gaps. In practice, 70–85% line coverage across the target-relevant source files is a reasonable baseline for a mature campaign. Branch coverage will be significantly lower — 50–70% is typical even for well-fuzzed targets, because many branches guard rare conditions (e.g. malloc failures).
Distinguish "unreachable by design" from "reachable but not unlocked." Code behind a feature flag your harness doesn't enable, or in a module your harness doesn't call, is not a coverage failure — it's a scoping decision. You should document these exclusions so you can justify them. Code in a parser branch that your harness does exercise but your corpus simply never triggers is a gap worth closing however! This is exactly the split that fuzz-reachability computes statically: from your harness entry point it derives the set of functions that can be reached and emits the complement as not_reached.txt. The analysis is sound on the unreachable side - a function it lists there genuinely cannot be hit by that harness - so an uncovered function in not_reached.txt is never a seed problem; it is either out of scope or needs a different harness. We return to this tool in the Unlocking coverage section.
Focus on high-value uncovered regions. Not all uncovered code carries equal risk. Prioritize:
- Code that parses or processes untrusted input: this is the primary attack surface!
- Complex conditional logic with many branches: combinatorial explosion means the fuzzer is unlikely to reach deep states without help.
- Error handling paths that still process attacker-controlled data: error paths that just return an error code are low risk; error paths that attempt partial cleanup or fallback parsing are high risk.
- Arithmetic operations that could overflow, especially in size calculations or buffer offsets.
- Code that interacts with external state (file I/O, network, memory mapping): these paths often have implicit assumptions about input validity.
Lower-priority targets are logging, debug output, assertion messages, graceful shutdown, version-string construction, and the like.
Watch for "shallow" coverage. A function can show as "covered" because one trivial path through it executed — for instance, the input was too short and the function returned early at the length check. Line coverage will show the function as partially covered, but the interesting logic deeper in the function was never reached. Branch coverage reveals this: you will see the early-return branch as taken and all subsequent branches as not taken. Always examine branch coverage, not just line coverage, when assessing whether a function is "adequately fuzzed."
What to look for in the report
Open the llvm-cov report in a browser. The top-level view shows a directory listing with per-directory coverage percentages.
Start with the overview, then drill down. The top-level view gives you a heat map of where coverage is strong and where it is weak. Sort by coverage percentage (ascending) to see the worst-covered directories first. These are your investigation targets.
Identify entirely uncovered files. Files with 0% coverage are the most important signal. They typically mean one of three things:
- The file implements functionality that no harness exercises. This is a missing harness problem.
- The file is dead code or is only compiled on a different platform. This is a scoping exclusion: note it and move on.
- The file is a test or example that should be excluded from the report via filter (
-ignore-filename-regex=...).
Identify partially covered files with low branch coverage. A file with 90% line coverage but 40% branch coverage is common and important. It means the fuzzer is reaching most of the code but only exercising the "happy path" through it. The conditional branches — the error cases, the boundary conditions, the rare format variants — are not being tested. These are prime targets for seed improvement or harness modifications.
Drill into individual files. Click into a file and examine the annotated source view.
llvm-covhighlights lines in green (covered), red (not covered), and orange (partially covered — for lines with multiple branches where only some were taken). The partially covered lines are often the most informative: they indicate exact branch points where the fuzzer got "stuck."
- Read the uncovered regions in context. Don't just look at the red lines in isolation — read the surrounding code to understand why they are red. Common patterns:
Missing format variant. A parser handles formats A, B, and C, but the corpus only contains format A inputs. The switch/case or if/else branches for B and C are entirely uncovered. This is typically a seed problem — the fuzzer can't mutate a format A input into a structurally valid format B input. Solution: add format B and C seed files.
Missing initialization option. The target library has a configuration step (e.g.,
set_mode(MODE_STRICT)) that the harness never calls. All code paths gated on that mode are uncovered. Solution: modify the harness to exercise the mode, either by adding a mode-selection byte or creating a separate harness.Guarded by magic value or checksum. A branch is only taken if a specific magic number or CRC check passes. Random mutation is astronomically unlikely to produce the correct value. In the coverage report, you'll see the comparison instruction covered (both inputs arrive) but the "match" branch never taken. Solution: provide a seed with the correct magic/checksum. For checksums specifically, also consider a custom mutator or patching the check.
Deeply nested conditional. The code is reachable in principle, but reaching the specific uncovered branch requires a combination of conditions: the buffer must be larger than some threshold, a specific byte must have a particular value, a prior parse step must have set an internal flag. The fuzzer hasn't stumbled onto this combination. In the report, you may see the outer conditions as covered (both branches taken) but one specific combination never occurring. Solution: construct a targeted seed; or use concolic execution to solve the constraint.
Error recovery code. The target catches a parse error and attempts recovery — re-parse with different settings, fallback to a simpler decoder, construct a partial result. This code is only triggered by malformed input that fails in a specific way. If all your corpus inputs are well-formed, these paths are untested. Solution: add deliberately corrupted inputs — truncated files, wrong magic bytes, fields with out-of-range values.
State-machine transitions. In protocol parsers, certain code is only reachable after a specific sequence of messages or state transitions. A single fuzzer input (a single packet or message) cannot reach code that requires "you must have sent a handshake, then a key exchange, then an encrypted record." Solution: a multi-step harness that simulates a conversation, or seeds that represent serialized session state.
- Build an inventory. As you examine the report, build a list of uncovered regions with a categorization. This doesn't need to be fancy — a spreadsheet or plain text file is fine:
| File | Line range | Gap type | Severity | Action |
|---|---|---|---|---|
parser.c |
312–340 | Missing format (CBOR) | High | Add CBOR seed files |
crypto.c |
78–95 | Missing API call | High | Add init_aead() to harness |
util.c |
200–215 | Error recovery | Medium | Add truncated inputs |
platform_win.c |
entire file | Platform-specific | Excluded | N/A — Windows only |
compress.c |
445–502 | Checksum guard | High | Construct valid seed + custom mutator |
This inventory is your work plan for the next iteration through the coverage loop.
Unlocking coverage
You have your coverage report and your gap inventory. Now you need to systematically close the gaps. The right approach depends entirely on why the code is uncovered.
The first and most important question for each uncovered region is: is this region reachable from an existing harness, or is it structurally unreachable?
To answer this, trace the call graph from your harness entry point to the uncovered code. Start at the uncovered function or branch, and work backwards: who calls this function? Under what conditions? Is there a path from LLVMFuzzerTestOneInput (or your entry point) to this location?
For small codebases, you can do this by reading the source. For larger ones, you may need tool support:
- Static reachability analysis (purpose-built):
fuzz-reachabilitycomputes the set of functions reachable from your harness entry point, across C/C++/Rust, so the reachable-vs-unreachable question is answered mechanically rather than by eye (detailed below). - Static call graph analysis: Use tools like
cflow,doxygen(with CALL_GRAPH/CALLER_GRAPH enabled), or IDE features (e.g. "Find Usages" / "Call Hierarchy" in VS Code with clangd). - Source code search: Often a simple
grep -rn "function_name"is enough to find the callers. Follow the chain until you either reach a harness entry point or reach a dead end (no harness calls into that subtree). - Ask an LLM: Paste the relevant source files and ask "Is this function reachable from this harness entry point, and if so, under what conditions?" LLMs are surprisingly effective at this kind of structural code analysis (more on this below in its own section).
Of these, fuzz-reachability is the one built for exactly this question. Point it at your build and harness entry point and it computes, uniformly across C, C++, and Rust (including mixed-language targets), the set of functions reachable from that entry — emitting reached.txt (the reachable functions) and not_reached.txt (everything else), plus a JSON report:
# C/C++ harness — defaults root at both main and LLVMFuzzerTestOneInput:
reachability run --lang cpp --project . --artifact tool/example
# Rust harnesses are first-class too (ziggy / cargo-fuzz / cargo-afl):
reachability run --lang ziggy --project fuzz/ziggy-harness/
A function that is uncovered and absent from every harness's reached.txt is structurally unreachable from your current harness set, so no amount of seeding will help. The result is a sound-leaning over-approximation: it never marks a truly reachable function unreachable, so not_reached.txt is trustworthy, while reached.txt may include a few functions reachable only in theory (each JSON entry carries a high/medium/low confidence to help triage those). It needs a coherent LLVM toolchain (≥ 21) and gllvm; see the project's worked examples for libxml2, the url crate, and cargo-afl targets. Note the obvious limitation: it tells you what is reachable, not what is easy to reach — a function in reached.txt may still sit behind a checksum or deep state machine.
The answer places each gap into one of four buckets:
- Reachable from existing harness => Add a seed that reaches the gap
- Reachable, but requires conditions the fuzzer cannot satisfy by mutation => Advanced techniques (targeted seeds, concolic execution, custom mutators)
- Not reachable from an existing harness, but just needs a missing input/config => Modify the harness
- Not reachable from any existing harness => Write a new harness
fuzz-reachability does most of this sorting for you: an uncovered function that shows up in some harness's reached.txt falls into bucket 1 or 2 (reachable — chase it with seeds and the advanced techniques below), while one that sits in not_reached.txt for every harness falls into bucket 3 or 4 (modify an existing harness, or write a new one). And since the tool emits a result per harness, the cleanest way to consume it across a multi-harness campaign is to let cov-analysis overlay it on the merged coverage report — see Annotating coverage with static reachability.
1. Adding a seed that unlocks the code region
Sometimes the harness is correctly configured and the code is reachable, but the fuzzer simply hasn't produced an input that triggers the uncovered path. This happens when the path requires a specific structure in the input — a magic number, a particular field combination, or a non-trivial encoding.
In these cases, supply an appropriate seed input:
For file format parsers: Find sample files that exercise the missing variant. If the parser handles PNG and the transparency feature shows no coverage, add a PNG that uses transparency. Public corpora for common formats are widely available: image test suites, RFC examples, format specification appendices. The Fuzzing Project and format-specific test suites on GitHub are good sources.
For protocol parsers: Capture or construct packets/messages that exercise the missing message type or option. Wireshark captures, RFC examples, and protocol test suites are useful starting points.
For configuration-dependent code: Create an input that includes the right configuration flags or header fields to trigger the uncovered mode.
For checksum/CRC-protected code: Create a valid input with a correct checksum. Note, however, that it is best practice to disable checksum checks at compile time by wrapping them in #ifndef FUZZING_BUILD_MODE_UNSAFE_FOR_PRODUCTION guards. The fuzzer cannot easily mutate past a checksum barrier. If checksum checking is active then the seed must be valid.
The mutation trap: Beware — some regions can be unlocked by a seed, but because of complex structural requirements, the fuzzer cannot meaningfully mutate the seed so that the region is actually fuzzed. For example, you can provide a seed with a valid CRC that reaches the post-CRC parsing code, but any mutation that changes the payload will invalidate the CRC, causing the post-CRC code to be skipped again. The fuzzer just oscillates between "CRC valid, boring payload" and "CRC invalid, skipped."
This is a critical distinction: reaching a code region once (with a seed) is not the same as fuzzing that region (with many varied mutations). If the structural constraint means mutations always break the invariant, you need a different approach:
- A structure-aware custom mutator that understands the format and produces valid variants (e.g., recalculates the CRC after mutation). AFL++ supports custom mutators via the
afl_custom_mutatorAPI. - Patching the check: disabling the CRC verification so that all mutations reach the post-CRC code.
- A grammar-based fuzzer or protocol-aware mutator (e.g.,
libprotobuf-mutatorfor protobuf inputs, or format-specific generators).
The choice depends on how important it is that the check itself is present during fuzzing. If the check is just a CRC or similar validation, patching it out is usually the way to go. You're still testing the parsing logic behind it with diverse inputs, which is what matters. If the check has security implications of its own (e.g., signature verification), you have to examine if you want to keep it and use a custom mutator instead.
To add seeds to a running AFL++ campaign, just use afl-addseeds, e.g. afl-addseeds -o out newseed.bin newseeds/ anotherseed.txt.
2. Problematic cases for unlocking
Some uncovered regions resist the straightforward approaches above. These require more advanced techniques:
1. Targeted fuzzing with reduced instrumentation.
If a specific code region is reachable but the fuzzer is not finding its way there because the "path" to it is long and the bitmap is dominated by other, already-well-explored regions, you can focus the fuzzer's attention.
The approach:
- Compile the target with coverage instrumentation limited to the area around the uncovered code. AFL++ supports partial instrumentation via
AFL_LLVM_ALLOWLIST/AFL_LLVM_DENYLIST— provide a file listing only the source files or functions you want instrumented.fuzz-reachabilityemitsreached.txt/not_reached.txtdirectly in this format (they double as sancov-fsanitize-coverage-allowlist/-ignorelistfiles), so you can usenot_reached.txtas a baseline denylist to stop instrumenting everything the harness can't reach, then hand-trimreached.txtdown to the region you want to focus on. (Skip this under full LTO —afl-clang-lto/-flto=full/ Rust already prunes unreachable code, so there is nothing left to gate.) - Minimize the corpus to only inputs that reach the area of interest (use coverage data to identify these).
- Fuzz with this reduced corpus and reduced instrumentation. The fuzzer now treats only progress toward the target region as interesting, ignoring coverage elsewhere.
Our advanced fuzzing post walks through this approach on a real target.
This is effectively a scoped, targeted fuzzing mini-campaign focused on a single gap. It is labor-intensive but effective for high-value targets.
2. Concolic execution to solve hard branches.
When a branch depends on a specific computation over the input — e.g., a hash comparison, a checksum validation, or a complex arithmetic condition — mutation-based fuzzing is unlikely to satisfy it by chance. Concolic (concrete + symbolic) execution can solve these constraints automatically.
SymCC is the most practical tool for this. It is a compiler wrapper that instruments the target for symbolic execution, then runs it concretely on a seed input while collecting symbolic constraints along the execution path. At branches, it asks an SMT solver (e.g., Z3) to find input values that would take the other direction.
The workflow:
- Compile the target with SymCC.
- Run it on the seed inputs that get closest to the uncovered branch.
- SymCC produces new inputs that satisfy the branch constraint.
- Add these inputs to the fuzzing corpus and re-run the fuzzer.
If you have trouble finding the right starting seed that is close to the region: just check the last covered line in the code, put an abort() there, run your corpus through and take an input that triggers that abort. (Then of course remove the abort() and recompile :-) )
Caveats: SymCC is expert-level tooling. Symbolic execution can be slow (especially for targets with loops or complex arithmetic over the input), and the solver may time out on hard constraints. You may need to increase solver time limits or simplify the target. SymCC also does not support all language features and can crash on complex C++ code. Finally it does not support all input types, e.g. floating point. But for specific hard branches — the kind where you can see in the source exactly what comparison the fuzzer needs to satisfy — it is often the only semi-automated solution.
3. Manual input construction.
For some constraints, neither the fuzzer nor symbolic execution will find a solution in reasonable time. The input requires a specific structure that can only be constructed by understanding the format specification. In these cases, write a script or program that generates a valid input exercising the target path. Sometimes unit tests exist that you can build upon. This is called seed engineering, it requires reading the code and/or specification and constructing a byte sequence that satisfies all the preconditions.
This is tedious but sometimes the only option, particularly for deeply nested protocol state machines or formats with multiple layers of interdependent checksums and length fields.
3. Adding to an existing harness
If the uncovered code is reachable from an existing harness but requires an API call, configuration option, or parameter that the harness currently does not exercise, the fix is straightforward: modify the harness.
Common patterns:
Adding an API mode or option. Many libraries have initialization options that gate which code paths are active. If your harness calls init(MODE_A) but never init(MODE_B), all MODE_B code is unreachable. The simplest fix is to have the harness choose the mode based on the fuzzing input: consume one byte to select the mode, then pass the rest to the parser:
int LLVMFuzzerTestOneInput(const unsigned char *data, size_t size) {
  if (size < 1) return 0;
  int mode = data[0] % NUM_MODES;  // select mode from first byte
  init(mode);
  parse(data + 1, size - 1);       // remaining bytes are the payload
  cleanup();
  return 0;
}
This approach is simple but has an important trade-off: now the fuzzer needs to "learn" that the first byte controls the mode, which reduces mutation efficiency as we learned in our blog post Fuzzing Made Easy #2: Unlocking the Secrets of Effective Fuzzing Harnesses. For a small number of modes and short inputs, this can be fine. For a large number of options or medium to longer inputs, consider separate harnesses instead.
Calling additional API functions. If the harness only calls parse() but the library also exposes validate(), transform(), serialize(), etc., you might need to call these too. Incorporate into the same harness or create separate harnesses if necessary.
Enabling error paths. If the target has configuration for strict vs. lenient parsing, and your harness only uses strict mode, the lenient-mode error recovery code is uncovered. Enabling lenient mode in another harness exposes this code.
4. Adding a new harness
A new harness is needed when a significant region of code is not reachable from any existing harness. This typically happens for several reasons:
Separate entry points. The library has multiple top-level APIs that are not connected. For example, an image library might have separate APIs for encoding and decoding, or a crypto library might have separate APIs for key generation, signing, and verification. Each requires its own harness.
Different input formats. If the library parses multiple file formats via separate entry points (e.g.,
parse_json()vs.parse_xml()), each format needs its own harness with appropriate seed files.Server-side vs. client-side code. In protocol implementations, the server path and client path often diverge early. A harness that exercises the client parser does not cover the server parser, and vice versa.
Initialization-heavy code. Some code paths are only reachable after complex multi-step initialization (open a context, configure it, feed it data in a specific order). If this sequence is fundamentally different from what any existing harness does, a new harness that performs the right initialization is needed.
Code that requires external state. Some code paths are gated on filesystem state, environment variables, or prior API calls that set internal flags. If mocking this state in an existing harness would contort it beyond readability, a dedicated harness is cleaner.
Mutually exclusive configurations. Sometimes enabling one code path necessarily disables another. If the library has compile-time or init-time settings where option A and option B are mutually exclusive, and both are security-relevant, you need two harnesses. A single harness with a mode byte won't help if the decision is made at initialization before the fuzzer input is read.
When writing a new harness, always start by identifying the minimal API path to reach the uncovered code. Do not write a harness that exercises the entire library — write one that targets the specific subsystem. A focused harness is more effective because the fuzzer does not waste effort on already-covered paths.
Using AI to help unlock coverage
Large language models can be a surprisingly effective tool for several coverage-unlocking tasks. The key is to give the model enough context: the relevant source code, the coverage report, and a clear description of what you're trying to achieve. Often a CLI agent or IDE plugin will be much more efficient than using a WebUI.
Note that text coverage output is better to understand by the AI than HTML or JSON (tested!). This is why the merge script example also generates a text report.
Generating seed inputs. Given the source code of a parser and a description of which branch you want to reach, an LLM can often produce a hex dump or a script that generates a valid input exercising that branch. This works best for text-based formats (JSON, XML, HTTP, configuration files) and reasonably well for simple binary formats. For complex binary formats with checksums or compression, the LLM may produce structurally correct but byte-level incorrect inputs. You'll need to fix up checksums or use a format-specific library. The approach is:
- Paste the relevant parser code (or at minimum the function containing the uncovered branch).
- Describe the input format (or paste the struct definitions / specification).
- Ask: "Generate a minimal input as a hex dump that takes the branch at line N where
condition." - Validate the output by running it through the coverage-instrumented binary and checking if the target branch is now covered.
A better approach is usually to have the AI write code that constructs the input via library calls and writes it out as a seed file. Forcing the AI through a test loop that confirms the generated input actually reaches the target region noticeably improves success rates.
Analyzing reachability. As mentioned earlier, LLMs are effective at tracing call graphs in source code. Paste the relevant source files and ask "Can function X be reached from entry point Y? What conditions are required?" This is often faster than manual grep-and-read for unfamiliar codebases, and the LLM can usually identify the chain of function calls and conditional checks needed.
Explaining uncovered code. Sometimes you encounter uncovered code in an unfamiliar part of the codebase and don't immediately understand what it does or why it exists. Paste the code and ask the LLM to explain it. Understanding the purpose of the code is the first step to determining whether it should be covered and how.
Expanding existing harnesses. Given a harness and the library API it targets, an LLM can suggest modifications to reach uncovered code. It can identify which API calls, initialization options, or configuration flags are needed and produce a modified harness. Always review the output carefully. LLMs sometimes hallucinate API functions or get argument types wrong, but it is usually faster than writing the modification from scratch.
Writing new harnesses from scratch. For uncovered subsystems that need a new harness, provide the LLM with: the library's API headers, existing harnesses as examples of the pattern you use, and a description of which functions need to be exercised. Also ask it to analyze the code — especially unit tests — to identify what setup is required. The LLM can produce a first draft that compiles (or nearly compiles) and covers the right entry point, which you then refine based on actual coverage results.
Limitations. LLMs struggle with:
- Precise byte-level construction of complex binary formats (they approximate but often get offsets, endianness, or padding wrong)
- Understanding implicit state dependencies across many translation units
- Producing correct code for unusual or underdocumented APIs
- Targets with complex build systems where the LLM doesn't know which compile-time options are active
Always validate AI-generated harnesses and seeds by compiling, running, and checking the actual coverage result. Treat the LLM output as a first draft, not a final solution.
Differential coverage and tracking progress
A single coverage report is a snapshot. To know whether your efforts are working, you need to compare snapshots across iterations. Differential coverage is how you track the effectiveness of harness modification, new seeds, and new harnesses you add.
Comparing coverage between runs
Comparing coverage runs is something you would expect llvm-cov to provide natively. It does not.
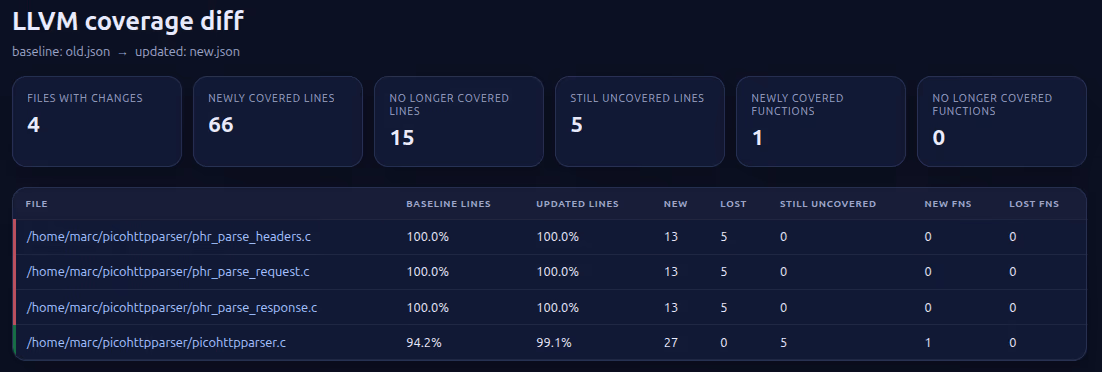
Using cov-analysis diff. If you already ran cov-analysis (see the automation subsection above) to generate your reports, diffing is a one-liner with no external script:
cov-analysis diff coverage_old.json coverage_new.jsonEven better: if you run cov-analysis twice against the same output directory, it automatically renames the previous coverage.json to coverage_old.json, so cov-analysis diff with no arguments diffs the previous run against the current one. The resulting coverage_diff.html shows:
- Newly covered lines and functions (the wins from your last change)
- No-longer-covered lines and functions (the regressions)
- Source snippets annotated with the coverage change
This is exactly the "save baseline → make change → re-run → compare" loop described in the evaluate-after-every-change workflow below, with the bookkeeping handled for you.
This is what such an HTML report looks like:
When is the fuzzing campaign "done?"
When is "done" actually done? A campaign is genuinely complete when:
- Coverage of target-relevant code is high, with no important or large uncovered regions remaining in input-processing paths.
- All remaining uncovered regions have been categorized (and perhaps documented): excluded (platform-specific, dead code, out-of-scope), accepted risk (too hard to reach, low severity), or addressed (e.g. new harnesses added).
- The fuzzer has run for a reasonable duration after the last coverage-improving change without finding new coverage or crashes.
There is no universal coverage threshold. "Done" is a judgment call based on the risk profile of the target and the resources available. But a well-documented coverage analysis that accounts for every significant uncovered region is far more defensible than a raw percentage number.
Using coverage deltas to evaluate changes
Every time you make a change to improve coverage — adding a seed, modifying a harness, writing a new harness — evaluate it systematically:
- Save the baseline. Before making the change, save the current
.lcovor.profdatafile. - Make the change and re-run the fuzzer for enough time to explore the new paths. For a seed addition, a few minutes to an hour is usually enough — the fuzzer will quickly find the new paths opened by the seed. For a new harness, run a full mini-campaign (hours to a day) to allow the fuzzer to build up coverage from the new entry point.
- Generate an updated coverage report and compare to baseline.
- Verify the intended effect: Did the target uncovered region become covered? If not, the change didn't work — investigate why. Common reasons: the seed doesn't actually reach the branch you thought it would (re-read the code); the harness modification has a bug; the build didn't pick up the change.
- Check for bonus coverage: Sometimes a new seed or harness unlocks more than you expected — a cascade of previously-unreachable code becomes reachable once one gate is opened. Note these gains.
- Check for regressions: In principle, adding a seed should only add coverage, never remove it. But if you modified a harness and changed its behavior (e.g., removed an API call to add a different one, or changed initialization in a way that disables a previously-active mode), you might lose coverage of the old path. If this happens, keep both variants — the old and new harness, or use a mode-selection byte to exercise both paths.
Evaluating after every change is the difference between disciplined and ad-hoc analysis. It ensures each change produces a measurable result, and catches regressions before they compound.
Conclusion
Coverage analysis is what turns fuzzing from a passive effort into a systematic, iterative one. The cycle is always the same: fuzz, measure, analyze, unlock, repeat. The tools are straightforward — clang's source-based coverage, llvm-cov for reports, and basic scripting for diffs. The hard part is not the tooling but the analysis: reading the report, understanding why each region is uncovered, and choosing the right technique to unlock it.
The most common mistake is skipping this step entirely, instead running the fuzzer for a fixed duration and declaring victory based on hours spent. The second most common mistake is generating a coverage report but only looking at the top-level percentage, without drilling into specific gaps. The value of coverage analysis is in the details: the uncovered branch that guards a buffer overflow, the missing format variant that would trigger error recovery, the initialization option that nobody remembered to fuzz.
If you take one thing from this article: after every fuzzing campaign, generate a coverage report, read it, build an inventory of gaps, and close the ones that matter. Then fuzz again.
A final reminder: coverage analysis is expensive. Time spent here is time not spent on a new harness, a new target, or another fuzzing campaign. Evaluate carefully where you want — or have — to spend your time.
Special thanks to Louis Merlin and Khaled Yakdan for reviewing this article!
Further reading
- LLVM/clang source based code coverage documentation
- LLVM llvm-cov documentation
- LLVM llvm-profdata documentation
- AFLplusplus/cov-analysis — automated coverage reports, diffs, and stability analysis for AFL++, libFuzzer, libafl, and honggfuzz corpora
- AFLplusplus/fuzz-reachability — static reachability analysis for C/C++/Rust fuzz harnesses: which functions an entry point can reach, emitted as sancov/AFL++ allow- and ignore-lists plus a JSON report that
cov-analysiscan fold into the coverage view
What We’ve Covered and What’s Ahead
Missed an article? Here’s the list:
✅ #0: Fuzzing Made Easy: Outline
✅ #1: How to write a harness
✅ #2: Unlocking the secrets of effective fuzzing harnesses
✅ #3: GoLibAFL: Fuzzing Go binaries using LibAFL
#4: How to write harnesses for Rust and Python and fuzz them
#5: How to scope a software target for APIs to fuzz
#6: The different types of fuzzing harnesses
#7: Effective Seeding
✅ #8: How to perform coverage analysis
#9: Correctly minimizing corpora
#10: How to run fuzzing campaigns
#11: Continuous fuzzing campaigns